
THE ENGINEERS ENTERPRISES
Create original and sample bills, keep client accounts, record payments and purchases,
print, and email bills to clients.
Contents
- Getting started
- Opening and closing
- Dashboard
- Creating an original bill
- Viewing, printing and changing a bill
- Sample bills (quotations)
- Finding bills
- Clients and balance
- Payments and collection
- Purchases
- Reports
- Email: connecting your account
- Client Email Master
- Sending bills and reminders
- Settings
- Using it on two computers
- Backup and safety
- Login, users and passwords
- Problems and answers
1. Getting started
The Bill Book runs on your own computer and opens in your web browser. Your bills are kept in the billbook folder (inside its data folder). No internet is needed except for sending emails.
Install (once on each computer)
- Open the billbook folder.
- Double-click Install Bill Book.
If Windows shows “Windows protected your PC”, click More info → Run anyway. - If it says Node.js is needed, type Y and press Enter. Click Yes if Windows asks for permission. (Node.js is the free program the Bill Book runs on.)
- When it says Done!, a Bill Book icon with your company logo appears on the Desktop and in the Start Menu.
2. Opening and closing
- Open: double-click the Bill Book icon on the Desktop. It opens in your browser at http://localhost:4000. If it is already open, the icon just brings it up again.
- Close: click ⏻ Close Bill Book at the bottom of the left menu.
3. Dashboard
The first screen shows this month's sales, money collected, purchases and the total amount clients still owe you, plus the most recent bills. Click any bill to open it.
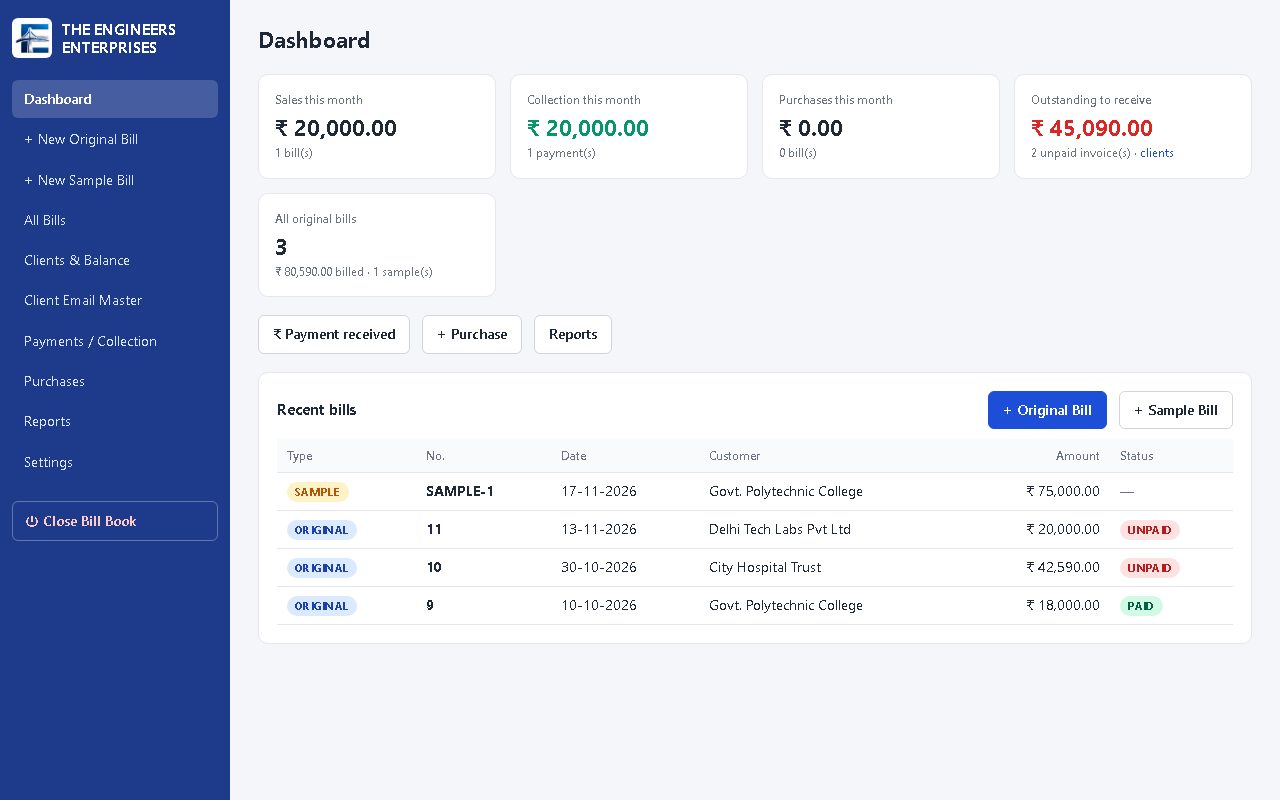
| Left menu | What it is for |
|---|---|
| + New Original Bill | A real tax invoice with the next invoice number and your signature |
| + New Sample Bill | A quotation / proforma marked “SAMPLE”, without signature |
| All Bills | Search, filter and export all bills |
| Clients & Balance | Every client and supplier with what they owe or you owe |
| Client Email Master | Each client's email address and copy (CC) emails |
| Payments / Collection | Money received from clients and paid to suppliers |
| Purchases | Bills from your suppliers |
| Reports | Sales, purchases, collection, GST and dues for any period |
| Settings | Company details, logo, signature, numbering, email |
4. Creating an original bill
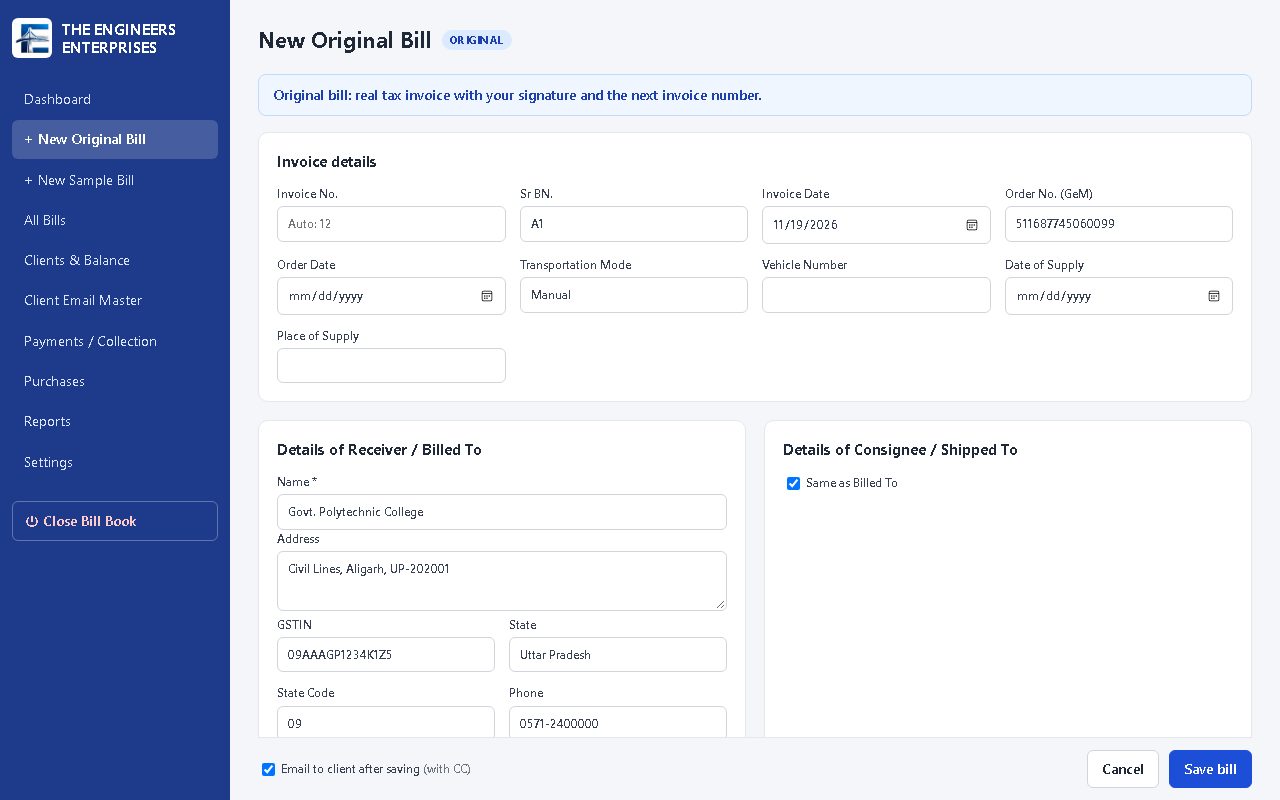
- Click + New Original Bill.
- Invoice details: the invoice number is filled in automatically (leave it empty). Enter the GeM Order No., order date, transport mode, vehicle number, date and place of supply as needed.
- Billed To: start typing the client's name. Saved clients appear in a list, and choosing one fills in the address, GSTIN, state and email. For a new client just type the details; the client is saved automatically.
- Shipped To: leave Same as Billed To ticked, or untick it and enter the delivery address.
Adding items
- Choose the GST type: CGST + SGST for clients in your state (Uttar Pradesh, code 09), or IGST for other states. It changes by itself when the client's state code is different.
- For each item enter the Description, HSN code, Qty and Rate (excl. GST). Click + Add item for more rows, or ✕ to remove a row.
- The totals, CGST/SGST/IGST, round off and amount in words are calculated as you type.
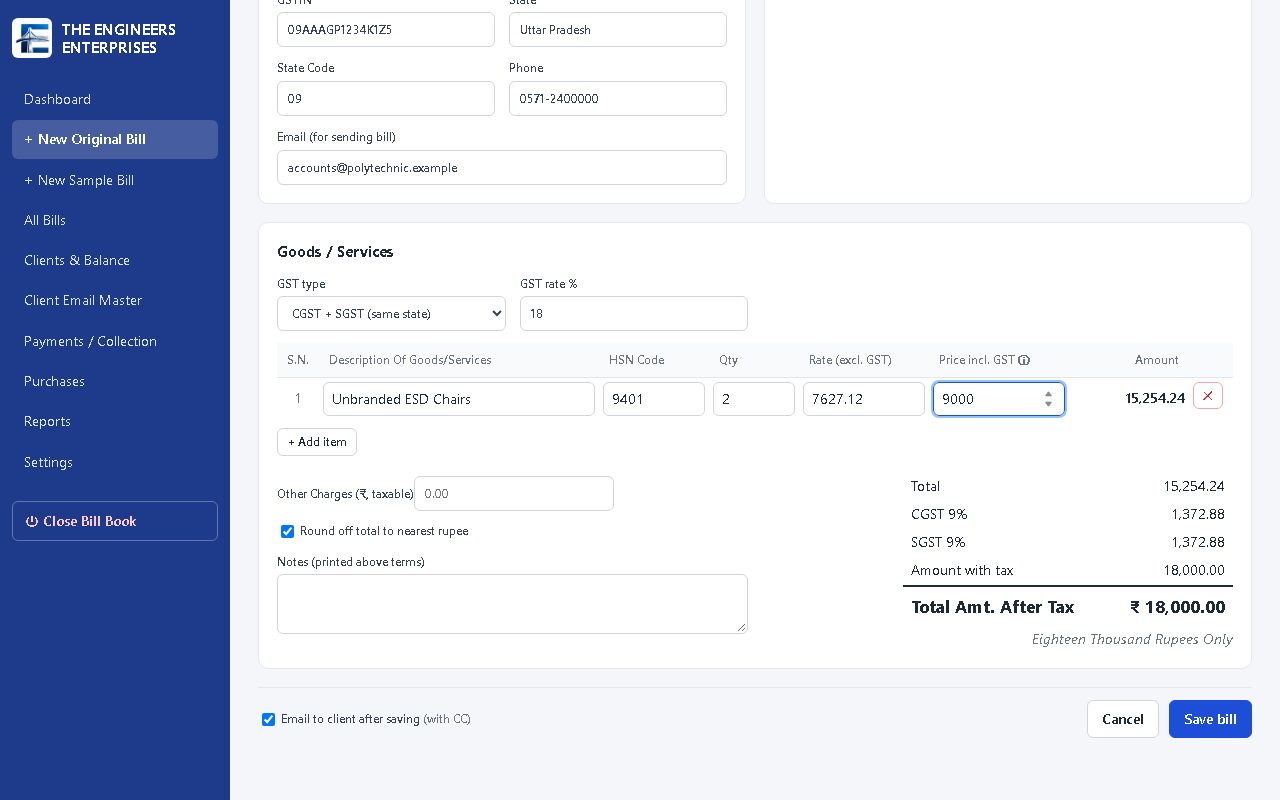
Other Charges (e.g. freight) are added before GST. Notes are printed above the terms.
Saving

- Tick Email to client after saving to email the bill PDF to the client straight away (see section 14).
- Click Save bill. The finished bill opens.
5. Viewing, printing and changing a bill
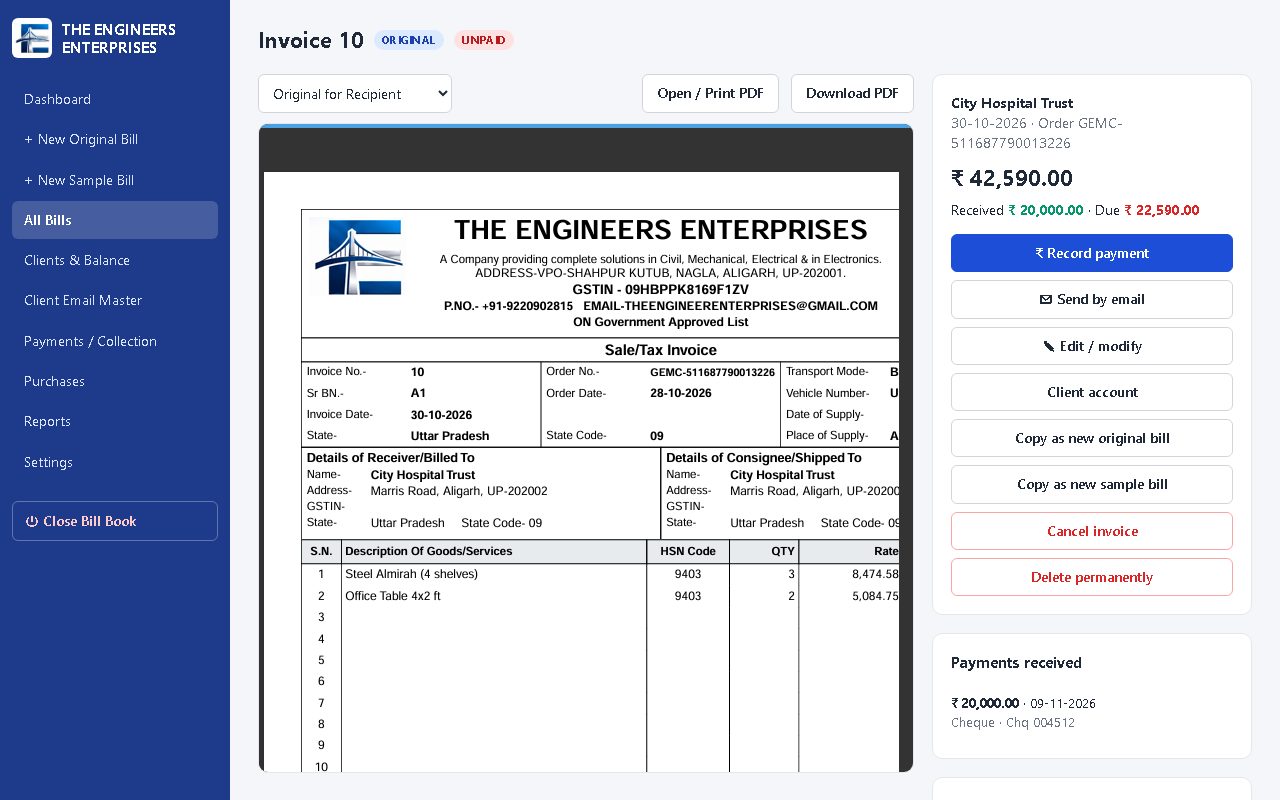
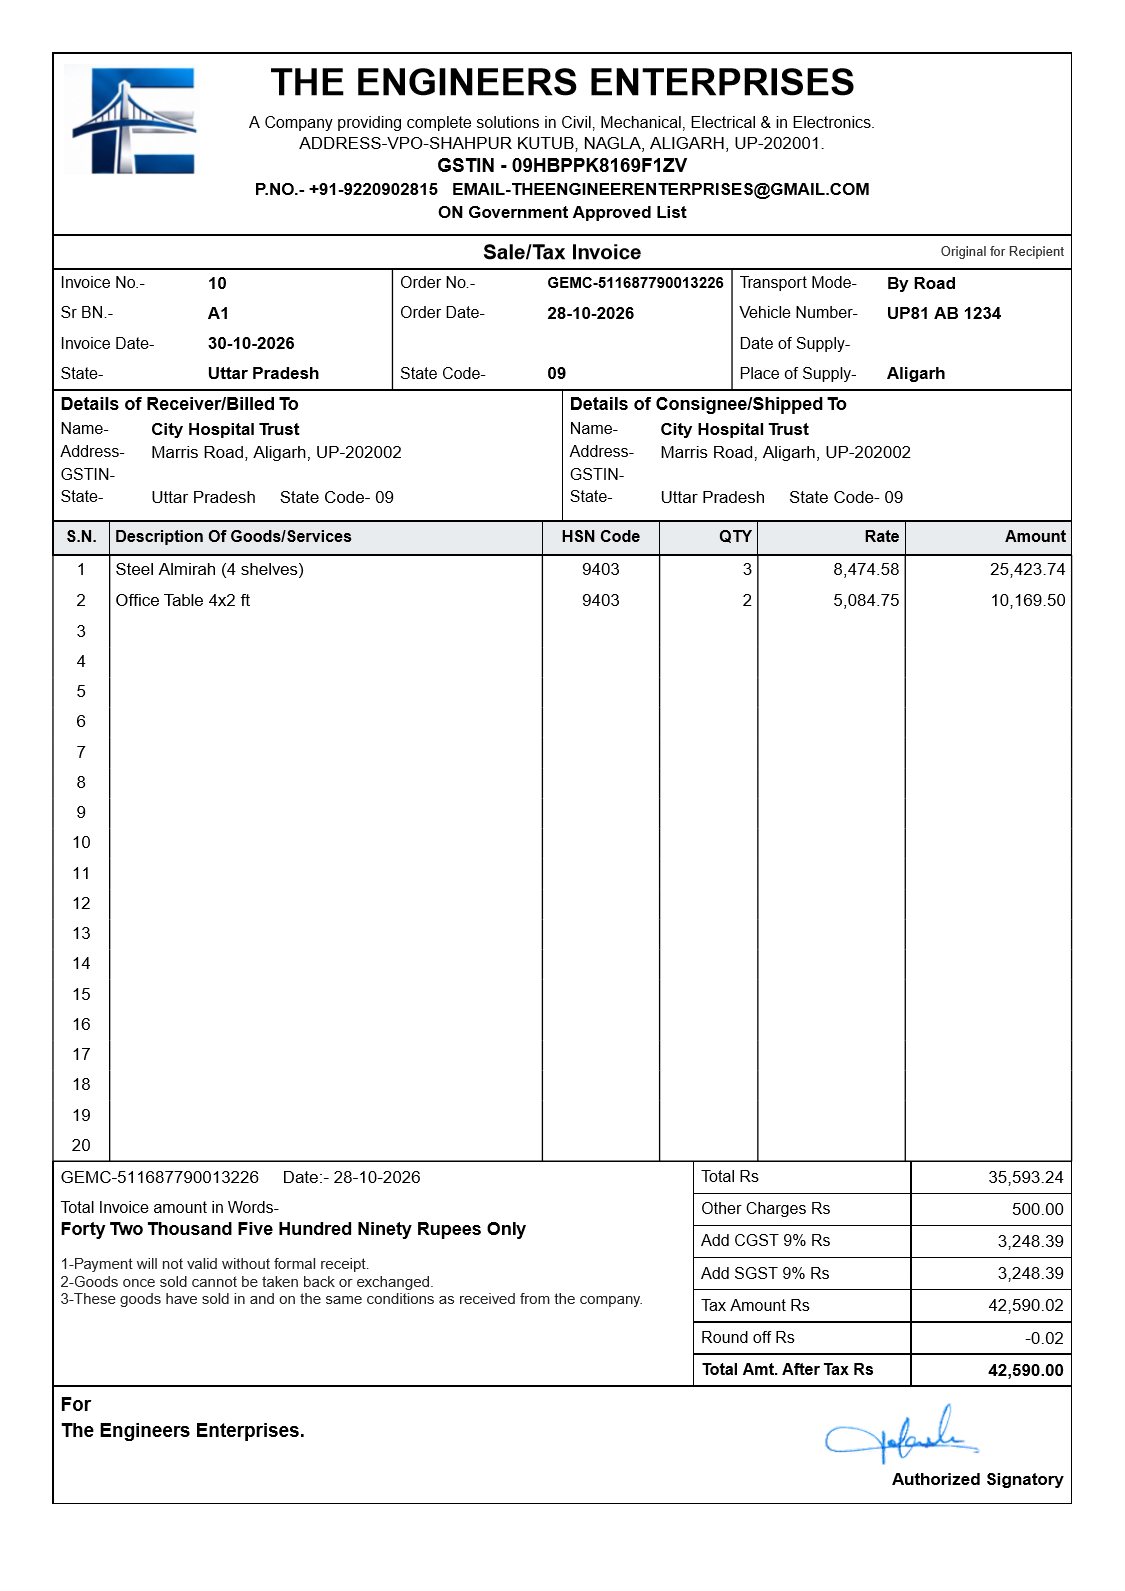
Printing
- Choose the copy: Original for Recipient, Duplicate for Transporter, Triplicate for Supplier, or no label.
- Click Open / Print PDF, then the printer icon (or press Ctrl+P). Print on A4.
- Download PDF saves the bill as a file, for example to send on WhatsApp.
Other buttons
| Button | What it does |
|---|---|
| ₹ Record payment | Records money received for this bill. The bill shows PAID when fully paid. See section 9. |
| ✉ Send by email | Emails the bill PDF to the client. See section 14. |
| ✎ Edit / modify | Change anything on the bill. Write a reason; the old version is kept in History. |
| Client account | Opens the client's ledger and balance. |
| Copy as new original / sample bill | Starts a new bill with the same client and items (good for repeat orders). |
| Cancel invoice | Marks the bill cancelled. It stays in the book but is not counted in sales or balance. It can be restored. |
| Delete permanently | Removes the bill completely. It cannot be undone; Cancel is usually better. |
6. Sample bills (quotations)
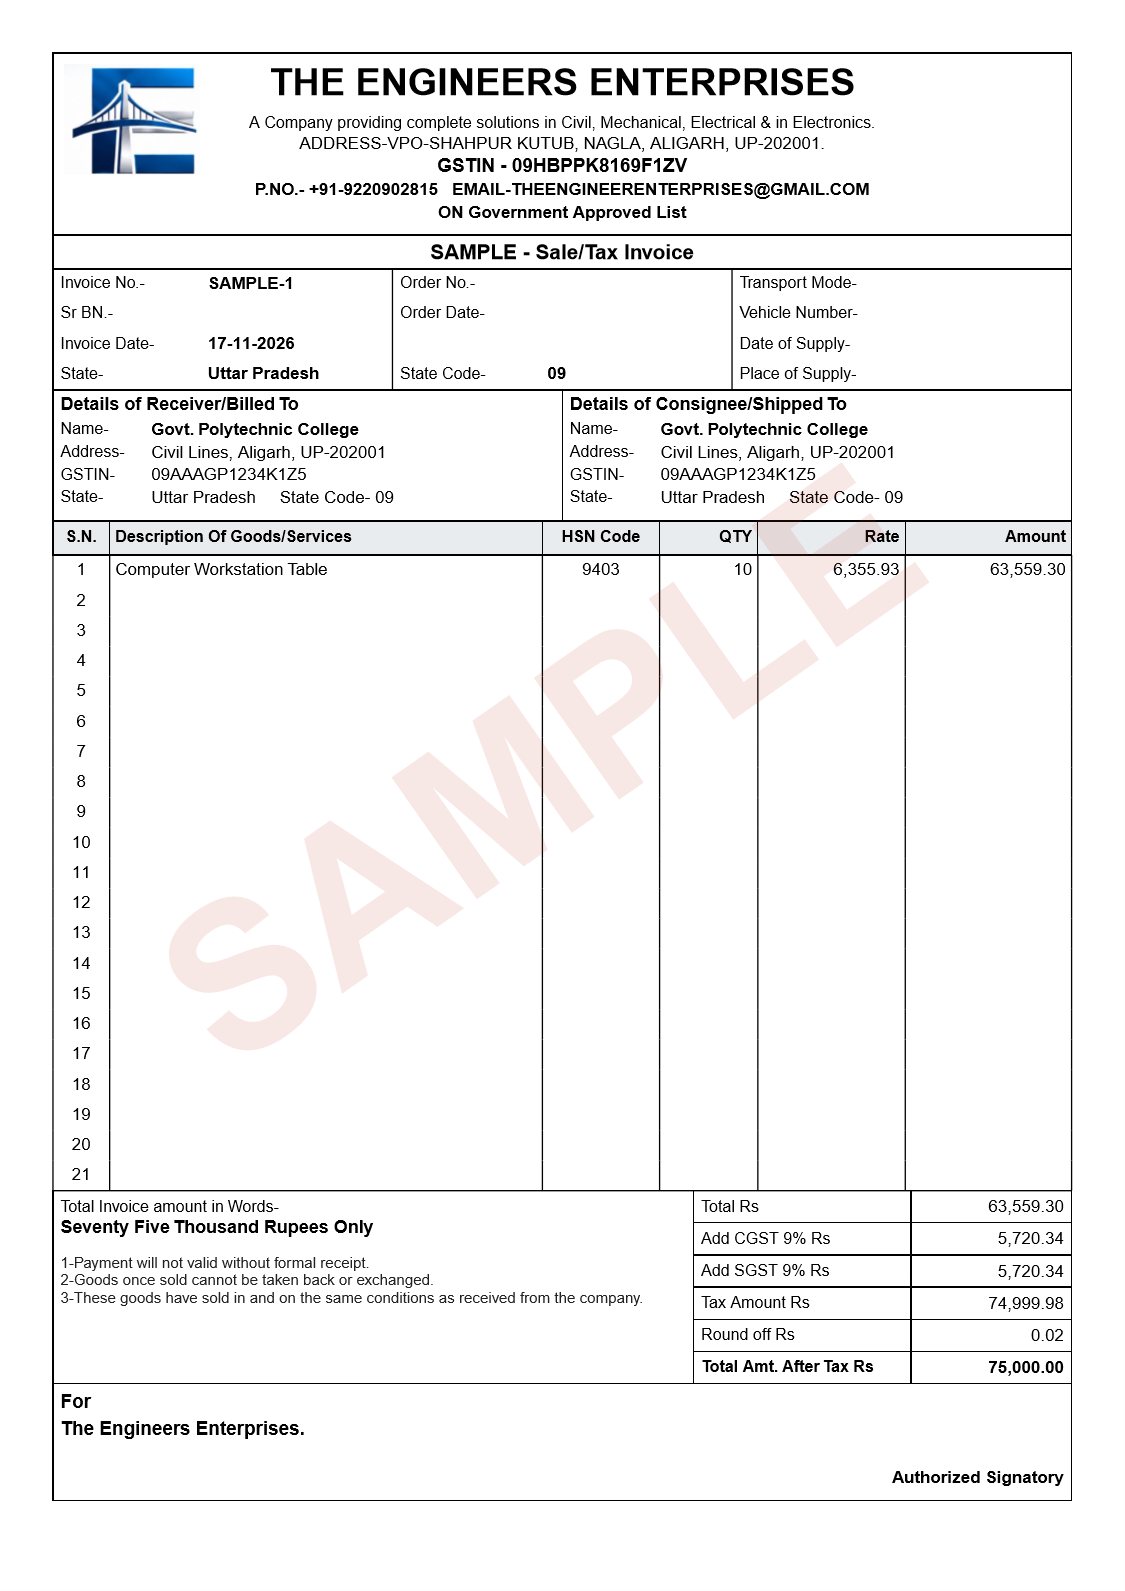
Use a sample bill for a quotation, proforma or price offer. It has its own numbers (SAMPLE-1, SAMPLE-2…), prints with a large SAMPLE mark and no signature, and is not counted in sales or client balance.
- Click + New Sample Bill and fill it in like an original bill.
- When the client confirms the order, open the sample bill and click Convert to original invoice. It gets the next invoice number and today's date.
7. Finding bills
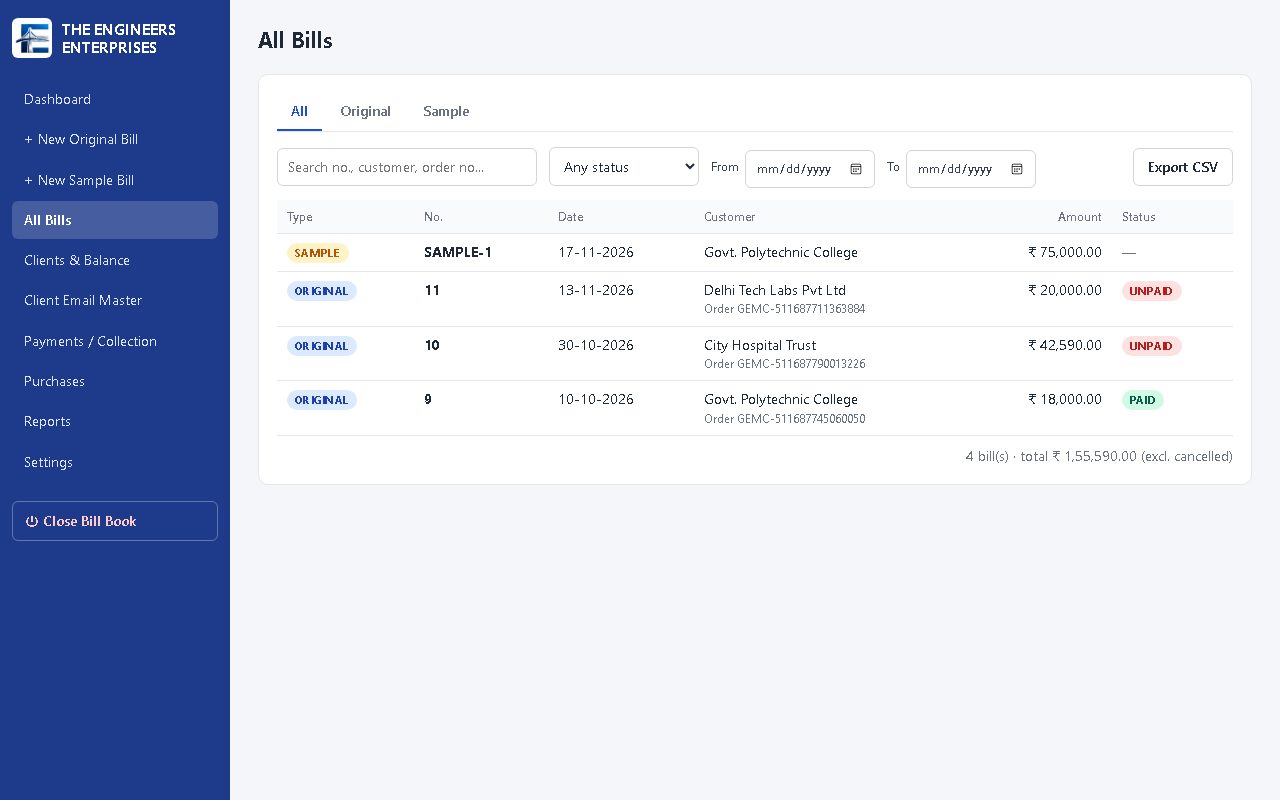
All Bills lists every bill. Use the tabs (All / Original / Sample), the search box (number, client or order number), status and dates. The total of the shown bills is at the bottom. Export CSV downloads the list to open in Excel.
8. Clients and balance
Clients & Balance shows every client and supplier with sales, money received, purchases, money paid and the balance: green = to receive, red = to pay.
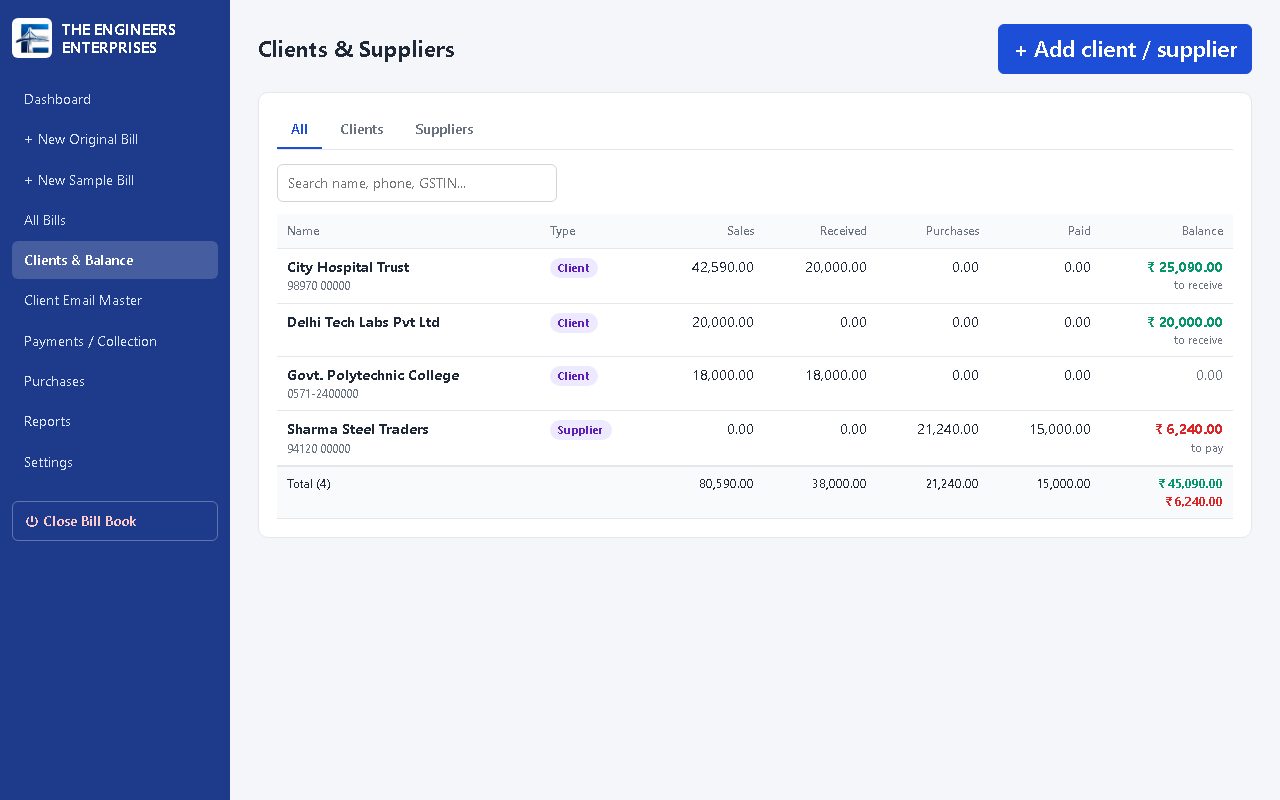
- Clients are added automatically when you save a bill. Use + Add client / supplier to add one by hand.
- Opening balance: if a client already owed you money before you started using the Bill Book, enter it as a plus amount (minus if you owe them).
Client account (ledger)
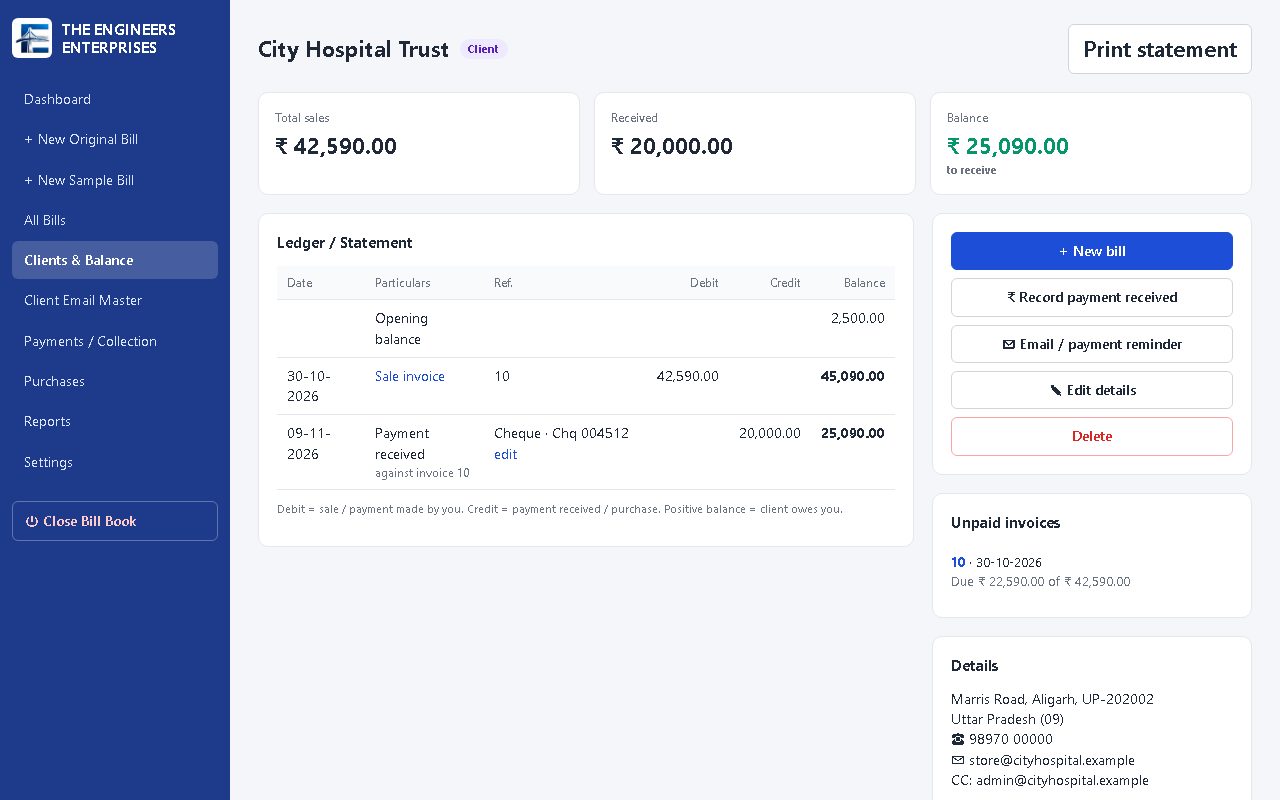
Click a client to see the full statement: every bill, payment and purchase with a running balance, plus unpaid invoices. Print statement prints it to give to the client.
9. Payments and collection
Money received from a client
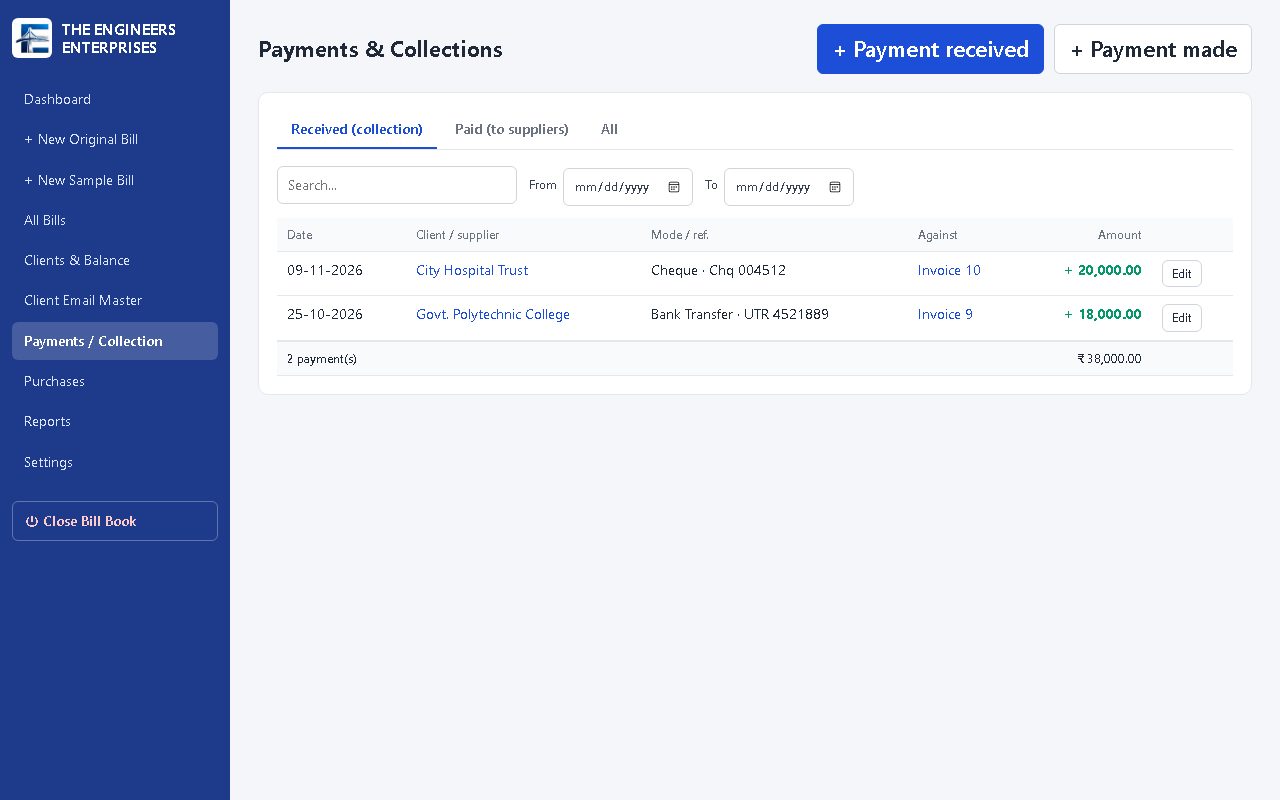
- Open the bill and click ₹ Record payment, or use Payments / Collection → + Payment received.
- Check the amount, date and mode (Cash, UPI, Bank Transfer, Cheque…), and add the UTR or cheque number.
- Choose the invoice under Against invoice. Click Save.
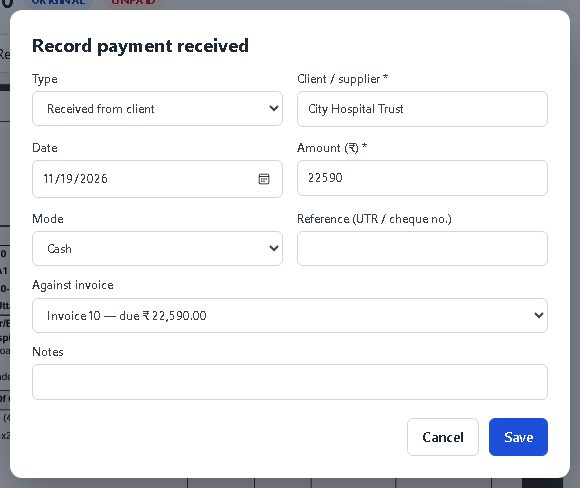
When the payments for an invoice reach its total, the invoice shows PAID automatically. A part payment shows the amount still due.
Money paid to a supplier
Use + Payment made (or the supplier's account page → Record payment made).
10. Purchases
Record bills from your suppliers so you can see what you owe and the GST you paid.
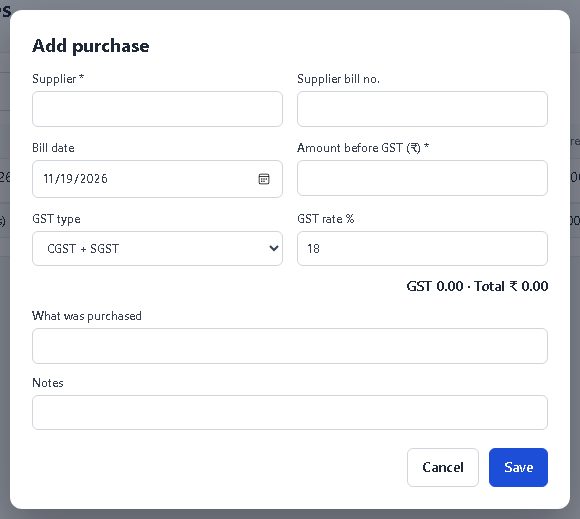
- Purchases → + Add purchase.
- Type the supplier name (a new supplier is created automatically), their bill number and date.
- Enter the amount before GST and the GST type and rate. The GST and total are calculated. Click Save.
11. Reports
Choose a period at the top: this month, last month, this or last financial year (April–March), all time, or your own dates.
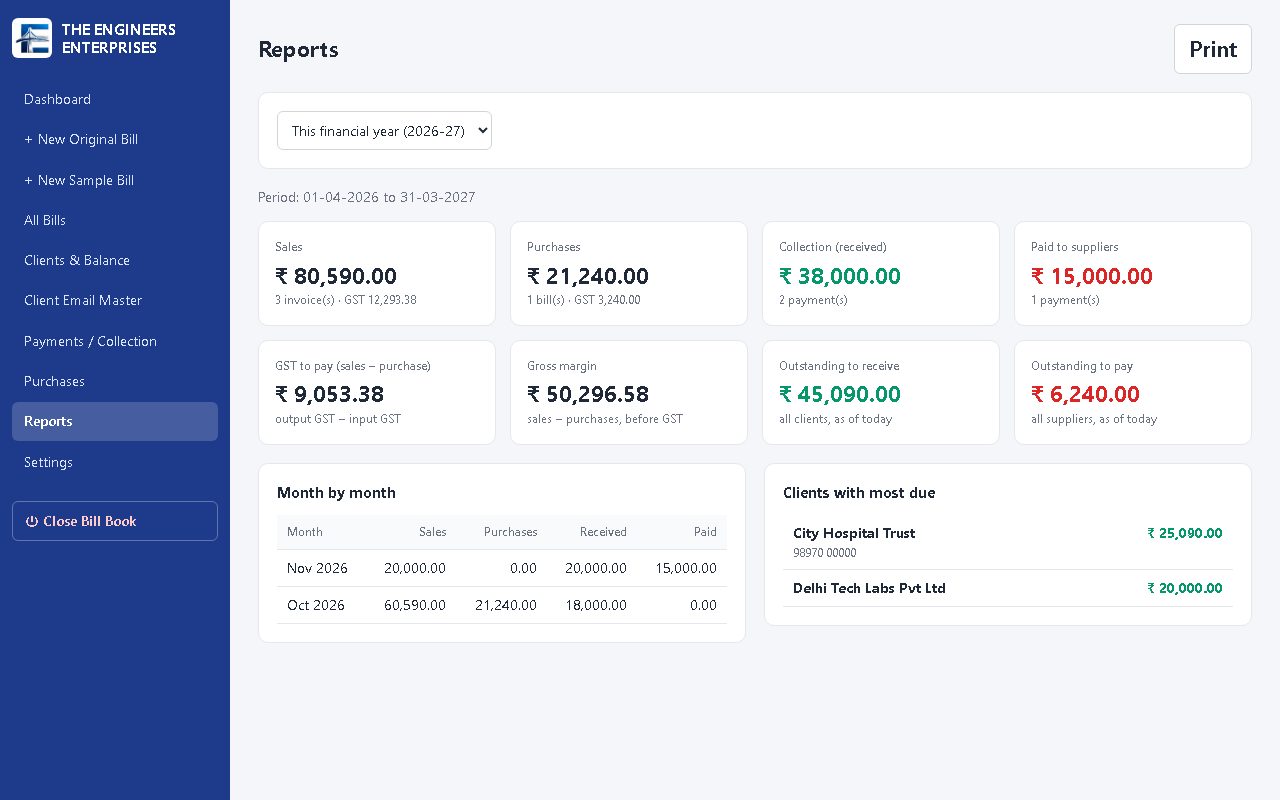
| Box | Meaning |
|---|---|
| Sales | Total of original invoices (cancelled and sample bills are not counted), and their GST |
| Purchases | Total of supplier bills and the GST on them |
| Collection | Money received from clients in the period |
| Paid to suppliers | Money you paid in the period |
| GST to pay | GST on sales minus GST on purchases (a guide; confirm with your accountant) |
| Gross margin | Sales minus purchases, both before GST |
| Outstanding | What all clients owe you, and what you owe suppliers, as of today |
Below are a month-by-month table and the clients who owe the most. Click Print to print the report.
12. Email: connecting your account
Bills are emailed from your own email account. Set this up once on each computer with the easy setup:
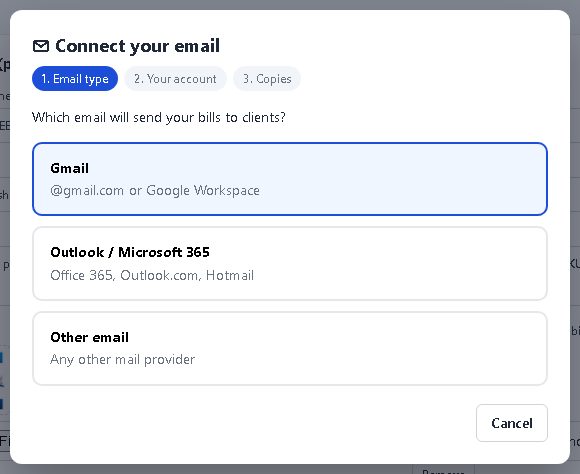
- Click ✉ Connect your email (on the Dashboard, in Settings → Email, or in the Client Email Master).
- Choose Gmail, Outlook / Microsoft 365 or Other email.
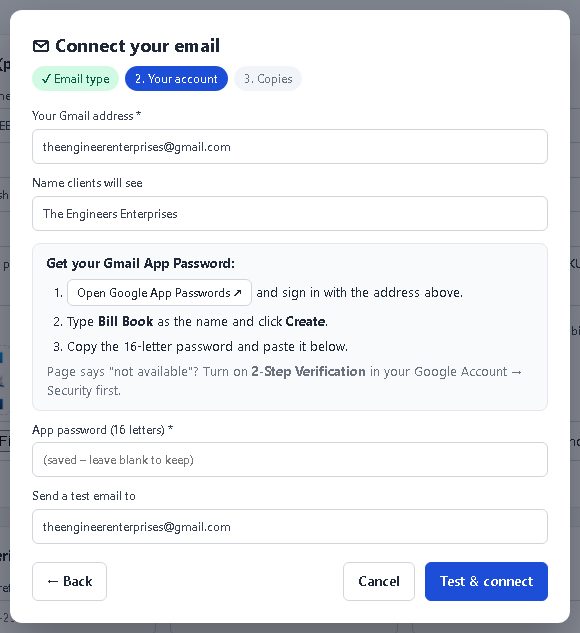
- Type your email address and the name clients will see.
- For Gmail you need an “App Password” (your normal Gmail password will not work):
- Click Open Google App Passwords and sign in.
- Type Bill Book as the name and click Create.
- Copy the 16-letter password and paste it in the Bill Book.
- Click Test & connect. A test email is sent; the settings are saved only if it works.
- On the last step, enter who should always get a copy (CC), e.g. your own email, and choose whether new bills are emailed automatically when saved. Click Finish.
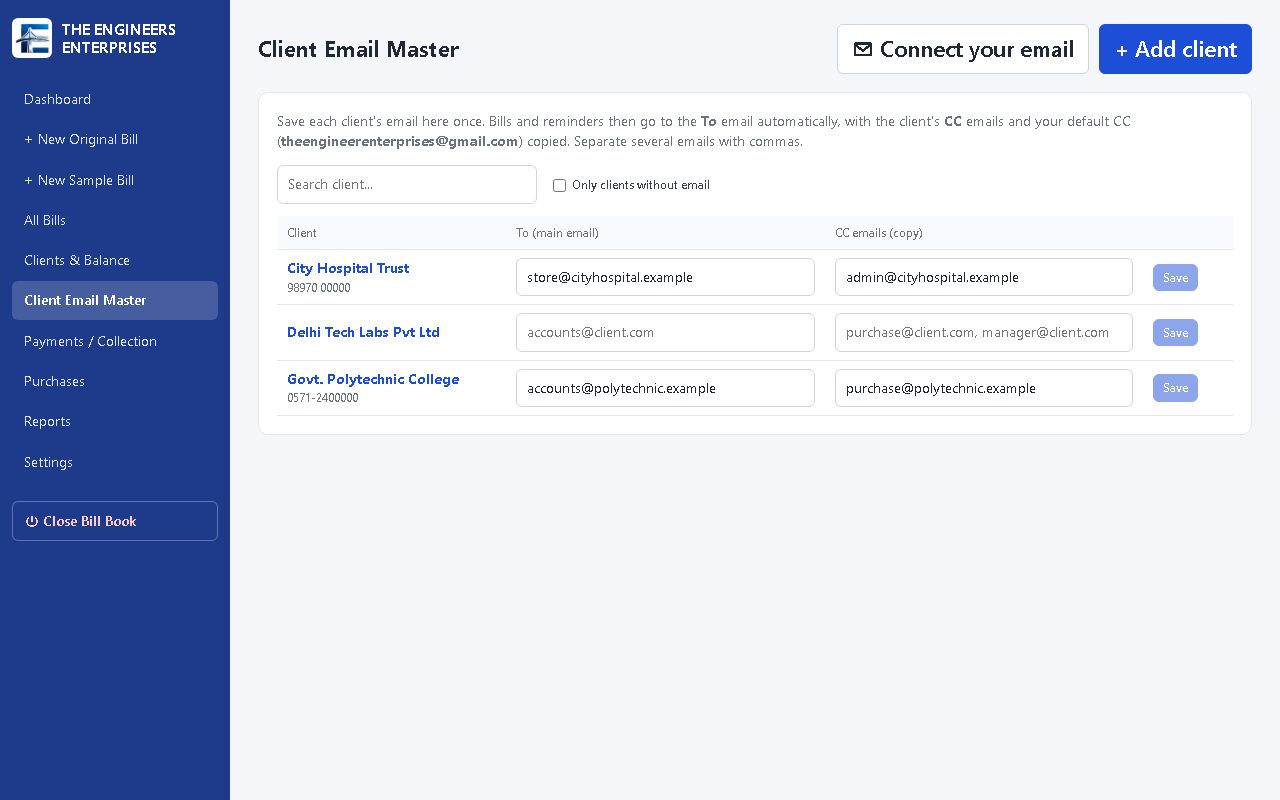
13. Client Email Master
Save each client's email addresses once, and every email then goes to the right people automatically.
- Click Client Email Master in the left menu.
- For each client, type the main email in To and any extra people to copy in CC emails (for example the purchase department or manager). Separate several emails with commas.
- Click Save on that row (or press Enter). ✓ Saved appears.
14. Sending bills and reminders
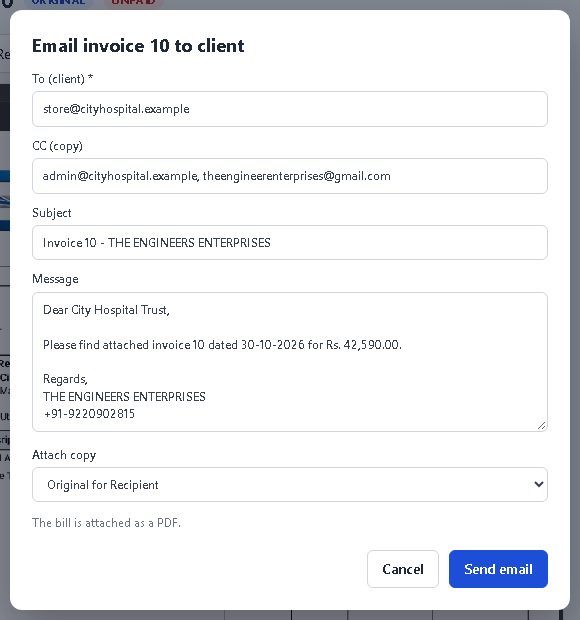
Send a bill
- When saving: tick Email to client after saving on the bill form.
- Any time later: open the bill → ✉ Send by email. The To, CC, subject and message are filled in; change them if needed, choose the copy to attach, and click Send email.
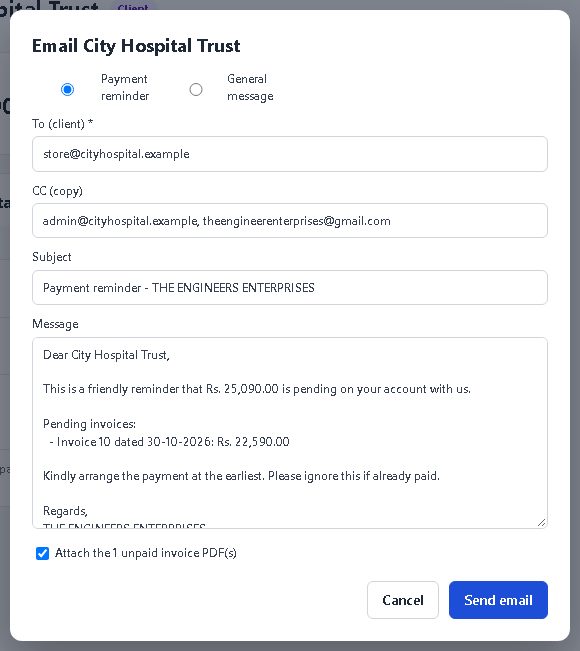
Payment reminder
- Open the client from Clients & Balance → ✉ Email / payment reminder.
- The message already contains the amount due and the list of pending invoices. Tick Attach the unpaid invoice PDF(s) to include the bills.
- Choose General message to write anything else. Click Send email.
Every email (sent or failed) is listed under Emails sent on the bill and on the client's page.
15. Settings
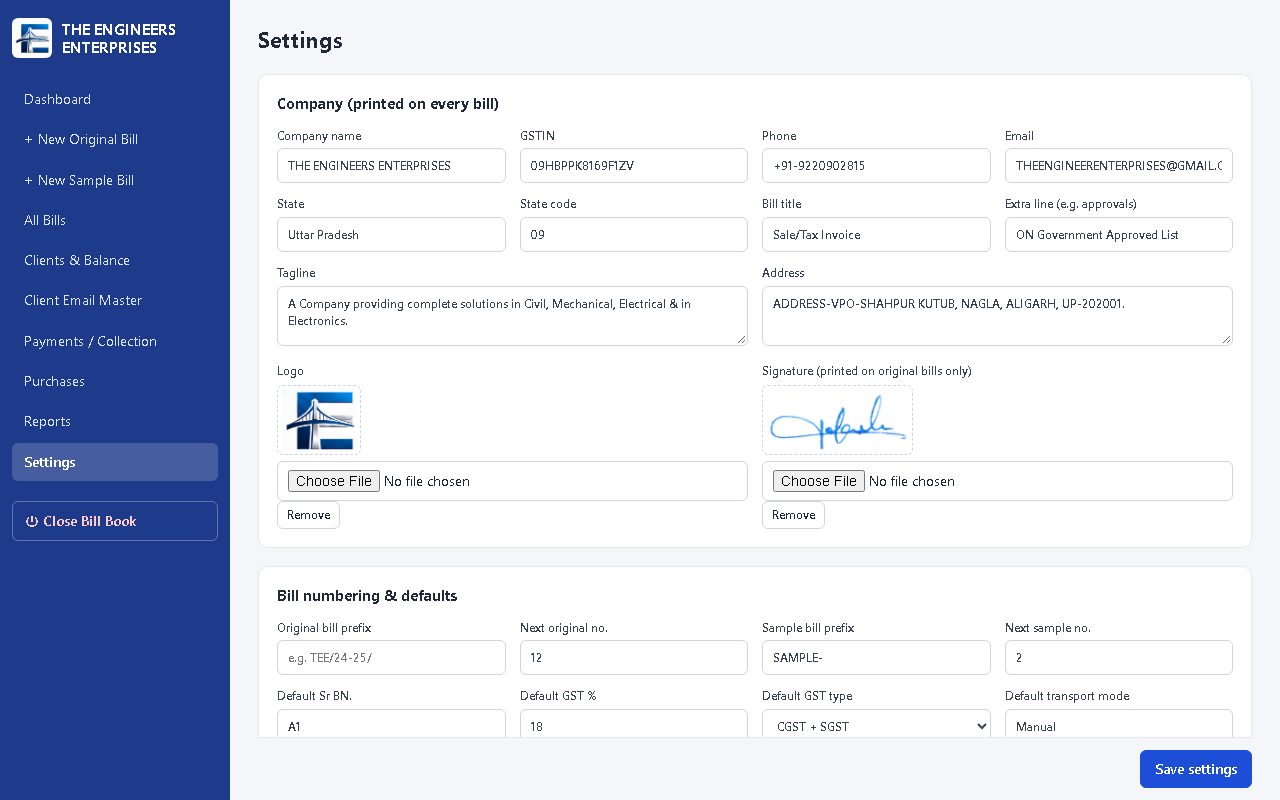
- Company: name, GSTIN, address, phone, email, state and the lines printed at the top of every bill.
- Logo and signature: click Choose File to change them. The signature is printed on original bills only.
- Bill numbering: the prefix (e.g. TEE/26-27/) and the next number for original and sample bills. At the start of a new financial year you can change the prefix and set the number back to 1.
- Defaults: GST rate, GST type, Sr BN and transport mode used for new bills.
- Terms & conditions and the signatory name printed at the bottom of every bill.
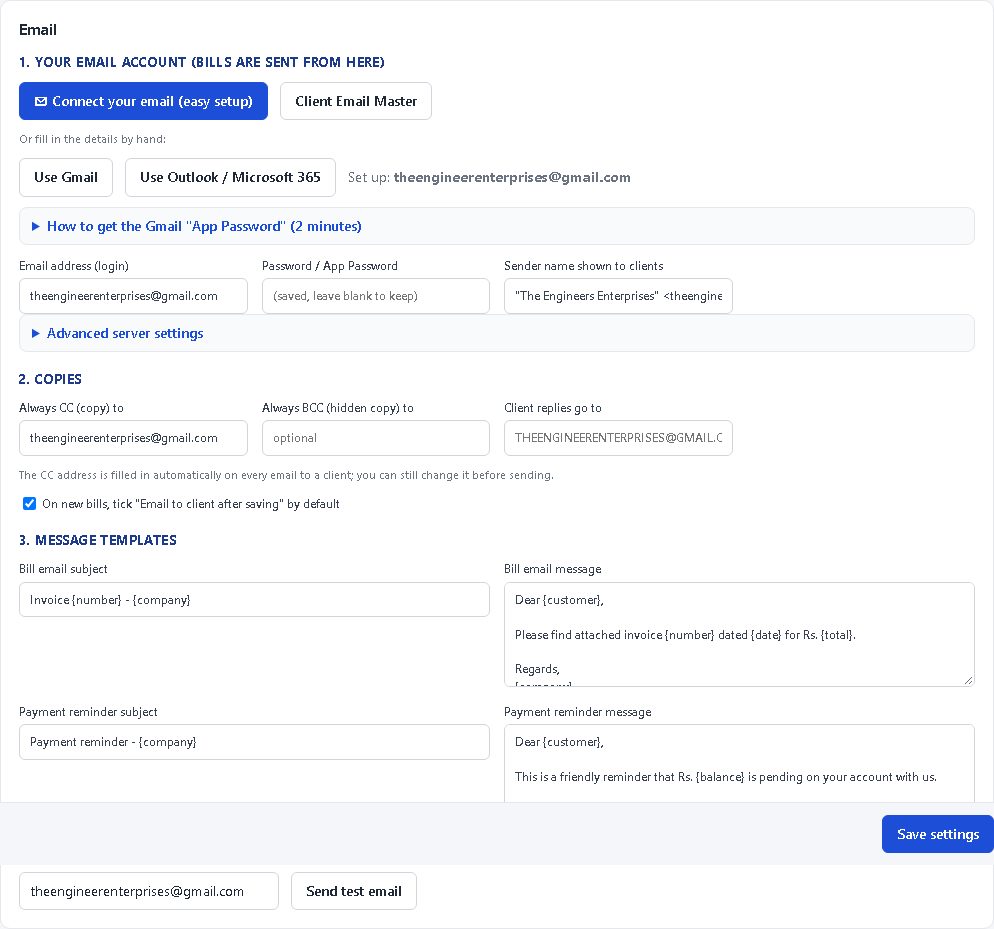
- Email: your email account, always CC/BCC, where client replies go, and the wording of bill and reminder emails.
Click Save settings after changes.
16. Using it on two computers
The Bill Book folder can be shared through OneDrive so that two people use the same bills, one at a time.
Sharing it
- Put the billbook folder in OneDrive (without the node_modules folder, if there is one) and share it.
- The other person opens the share link → Add shortcut to My files, waits for the green tick, then right-clicks the folder → Always keep on this device.
- They run Install Bill Book once (section 1). After moving the folder yourself, run it again too.
17. Backup and safety
- All bills, clients, payments and settings are in one file: billbook\data\billbook.db.
- Back it up regularly: close the Bill Book, then copy this file to a pen drive or another folder (rename the copy with the date, e.g. billbook-2026-11-30.db).
- To restore a backup: close the Bill Book and put the backup file back in the data folder as billbook.db.
- Never delete or rename the data folder.
- If a red warning says OneDrive made a conflict copy, the bill book was used on two computers at once. Bills saved in that copy are not in the app; check them, then move the copy out of the data folder.
18. Login, users and passwords
Logging in
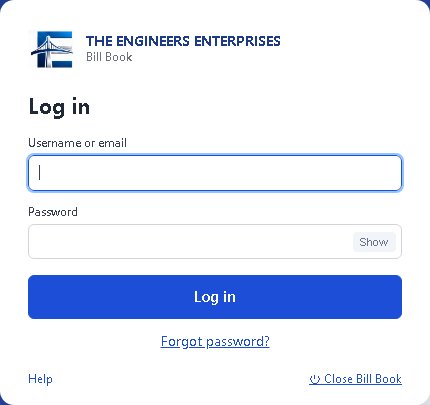
Each person has their own username and password. Type your username or email and password, then click Log in. Click Show to see what you typed. Your name appears at the bottom of the left menu, with My account and Log out.
Admin and Staff
| Role | Can do |
|---|---|
| Admin | Everything, including Settings, Users and permanently deleting bills, clients, payments and purchases. |
| Staff | Make and edit bills, sample bills, payments, purchases; send emails; see clients and reports. Cannot open Settings or Users, and cannot permanently delete anything (they can cancel a bill). |
The bill History shows who created or changed each bill.
Creating users (admin)
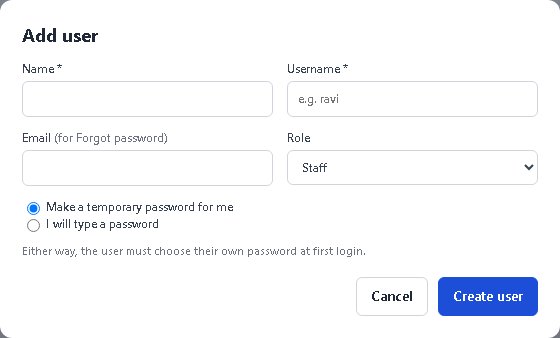
- Click Users in the left menu → + Add user.
- Enter the name, a username (e.g. ravi, no spaces), email and role.
- Leave Make a temporary password for me selected. If email is connected, tick Email the login details.
- Click Create user. The username and temporary password are shown; give them to the person. At their first login they must choose their own password.
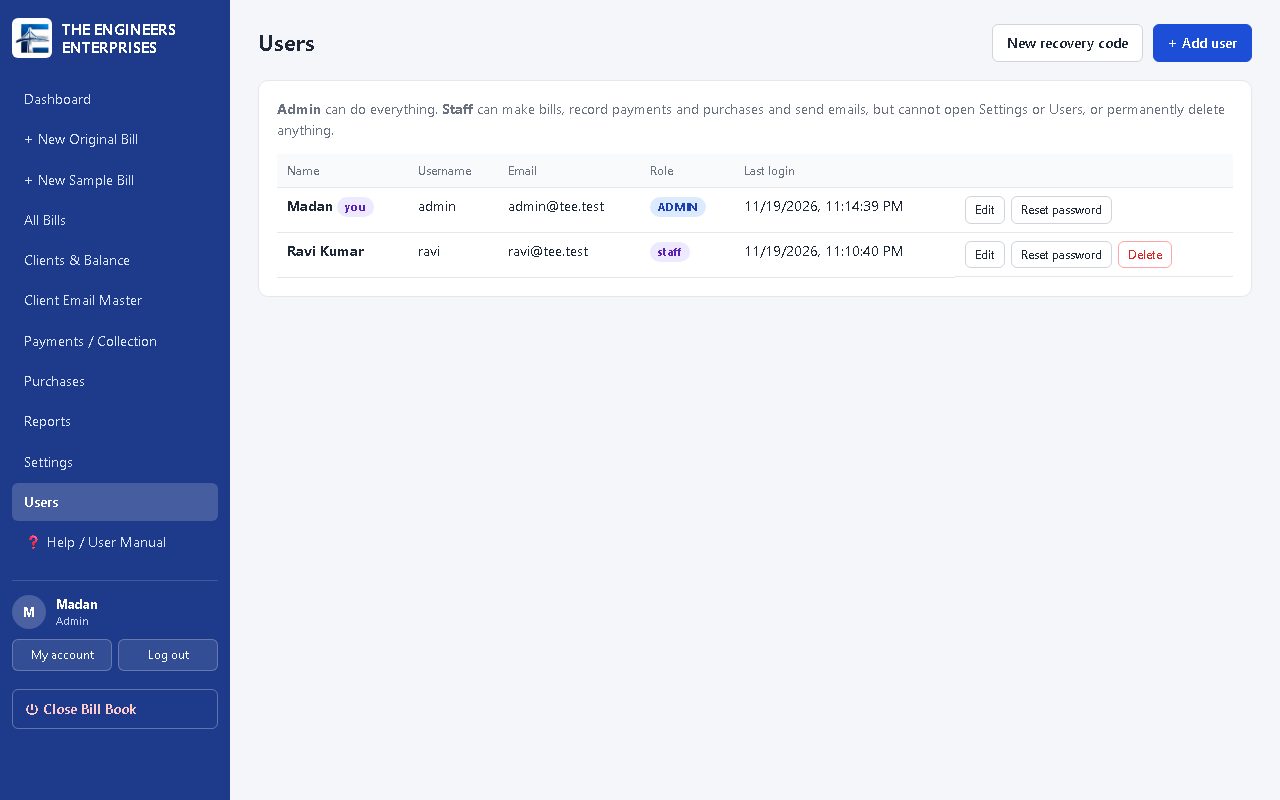
- Edit: change name, email or role, or untick Active to stop someone logging in (their bills stay).
- Reset password: makes a new temporary password (emailed if possible). The user must choose a new one at next login.
- Delete: removes the user. Bills they made are kept. The last admin cannot be removed.
Changing your own password
Click My account (bottom of the left menu). You can change your name, email and password. Keep your email filled in, so “Forgot password” can send you a code.
Forgot password
- On the login screen click Forgot password? and type your username or email.
- Click Email me a reset code. A 6-digit code is sent to your email (valid 15 minutes; check Spam).
- Type the code and your new password. You are logged in.
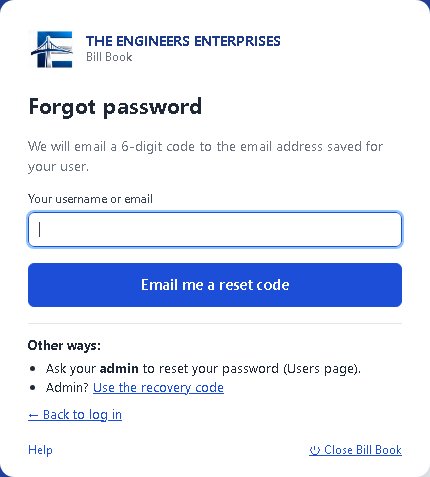
This needs the Bill Book email to be connected (section 12) and an email saved for your user. If not:
- Staff: ask the admin to click Reset password for you on the Users page.
- Admin: on the Forgot password screen click Use the recovery code, enter your username, the recovery code from the first start, and a new password. A new recovery code is then shown; write it down (the old one stops working). An admin can also make a new recovery code any time on the Users page.
- Last resort (admin password and recovery code both lost): close the Bill Book, open the billbook folder and double-click Reset admin password. Type YES; it shows a temporary password for the admin.
19. Problems and answers
| Problem | What to do |
|---|---|
| “The bill book is OPEN on computer …” | Someone else has it open. Ask them to click Close Bill Book, wait for the OneDrive green tick, then open it again. If that computer was switched off without closing, try again in 5 minutes. |
| “Wrong username or password” | Check Caps Lock and click Show to see what you typed. You can also log in with your email. Still stuck: Forgot password? (section 18). |
| “Too many wrong tries. Wait … seconds” | Wait the time shown, then try again carefully, or use Forgot password?. |
| “This user is disabled” | Ask the admin to tick Active for you on the Users page. |
| Settings or Users missing from the menu | You are logged in as Staff. Only an admin can open them. |
| Double-clicking the icon does nothing | Wait 10 seconds (the first start is slower). Otherwise run start-billbook.bat in the billbook folder to see the message. |
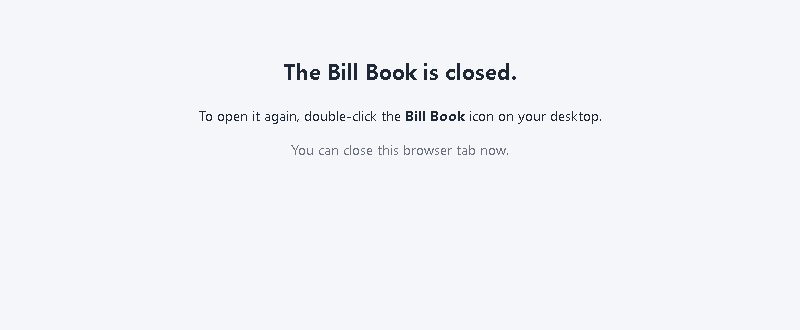
| “The Bill Book is closed” in the browser | It was closed (or closed itself after 15 minutes). Double-click the Desktop icon again. |
| “The email password was not accepted” | For Gmail use an App Password, not your normal password (section 12). Run Connect your email again. |
| “No email address for …” | Add the client's email in the Client Email Master (section 13). |
| Client did not receive the email | Ask them to check Spam. Check the address in the Client Email Master and the Emails sent list on the bill. |
| Wrong amount on a saved bill | Open the bill → Edit / modify, correct it and write the reason. The old version stays in History. |
| Invoice shows UNPAID but the client paid | Record the payment against that invoice (section 9). |
| Want to start numbers again for a new year | Settings → Bill numbering: change the prefix and set Next original no. to 1. |
| New computer | Copy (or share) the billbook folder and run Install Bill Book on the new computer. |
— End of manual —